How to Test a Van Solar System With a Multimeter
By Frank Zale · September 15, 2026 · 6 min read
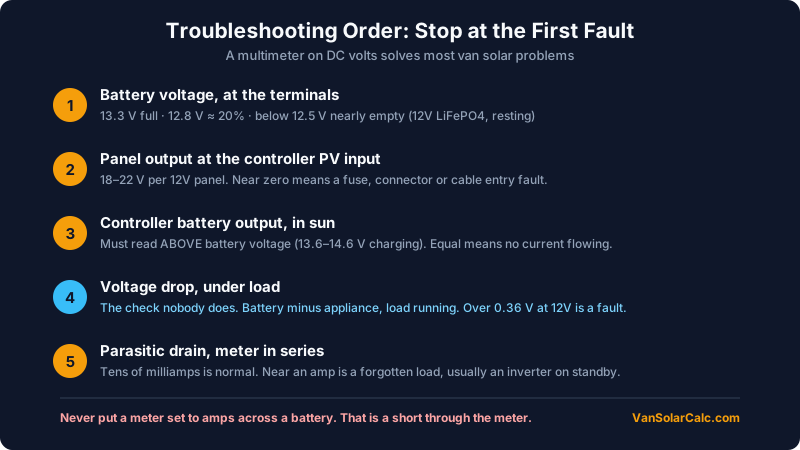
A multimeter turns "my solar is not working" into a specific fault in about ten minutes. You do not need an expensive one. Any meter that reads DC volts and DC amps will do, and the DC volts function alone solves most problems.
This is the sequence to work through, in order, so you stop at the first thing that is actually wrong.
Safety first, briefly
Measure voltage with the circuit live. Measure current only if your meter is rated for it and you know where to break the circuit. Never put a meter set to amps across a battery: that is a short through the meter, and on a lithium bank it is genuinely dangerous. Check the dial before every measurement.
Step 1: What is the battery actually at?
Put the meter on DC volts and measure directly at the battery terminals, not at a distribution panel.
| Reading (12V LiFePO4, resting) | State |
|---|---|
| 13.4 V or above | Full or charging |
| 13.0 to 13.3 V | Comfortably charged |
| 12.9 to 13.0 V | Around half |
| 12.8 V | Roughly 20% left |
| Below 12.5 V | Nearly empty, or a cell problem |
LiFePO4 has a famously flat curve, which is why voltage is a poor fuel gauge and a shunt monitor is worth having. But for fault-finding it is enough to tell you whether the battery is being charged at all.
Lead-acid and AGM read differently: 12.7 V is full, 12.0 V is about half, and below 11.8 V is deeply discharged.
If the battery reads normal but your loads do not work, the fault is downstream, so skip to step 4.
Step 2: Are the panels producing?
Measure DC volts across the panel output, at the controller's PV input terminals, in daylight.
You should see roughly the array's open-circuit voltage: about 18 to 22 V for a single 12V-nominal panel, and higher for panels in series. Two panels in series showing around 40 V is normal.
- Near zero in good sun: the fault is upstream of this point. Check the PV fuse or breaker, the MC4 connections on the roof, and the cable entry gland.
- Roughly half what you expect with panels in series: one panel or one connection is dead. Measure each panel individually at its own connectors.
- Correct voltage but no charging: the panels are fine. Move to step 3.
Panel voltage stays high even in poor light, so a healthy voltage reading does not prove the array is producing useful current. It only proves the circuit is intact.
Step 3: Is the controller passing current through?
Measure DC volts at the controller's battery output terminals while the sun is on the panels.
That reading should be slightly above the battery voltage you measured in step 1, because charging works by pushing voltage a little higher than the battery is resting at. Typically 13.6 to 14.6 V for LiFePO4 in bulk charge.
- Output equals battery voltage exactly, with no charging: the controller is not passing current. Check its settings for the right battery chemistry, and check the controller-to-battery fuse.
- Output well below battery voltage: the connection between controller and battery is bad, or the fuse has failed.
- Controller shows an error or will not start: many will not power up from the PV side alone. They need to see the battery first. Confirm the battery connection is live.
Step 4: Hunt for voltage drop
This is the check that finds the faults everything else misses, and almost nobody does it.
Measure voltage at the battery terminals. Then measure at the far end of the circuit you are troubleshooting, at the appliance itself, with the load running. Subtract.
- Under 3% (about 0.36 V on a 12V system) is healthy.
- More than that means resistance in between: undersized cable, a corroded lug, a loose terminal, or a crimp that was never done properly.
A fridge that cuts out on low voltage while the battery reads 13.1 V is nearly always this. The battery is fine; the cable or a connection is eating the difference.
If the drop is real, our wire size calculator will tell you what that run should actually be, using ABYC ampacity and a 3% limit.
Step 5: Find the parasitic drain
If the bank empties overnight with everything apparently off, something is still drawing.
Switch off every load you know about. Break the main negative connection and put the meter in series, set to DC amps on the 10 A range. That reads total current with "nothing" running.
A few tens of milliamps is normal for a monitor, a controller and a BMS. Anything approaching an amp is a load you have forgotten: an inverter left in standby is the usual culprit, followed by a stereo memory circuit or a cell booster.
A quick fault table
| Symptom | Most likely cause | Check |
|---|---|---|
| No charging at all, panels fine | Blown PV fuse, controller settings | Steps 2 and 3 |
| Charges in summer, not winter | Array undersized for winter sun | Winter figures on location pages |
| Battery reads fine, appliance cuts out | Voltage drop | Step 4 |
| Bank empty by morning | Parasitic drain or undersized bank | Step 5 |
| Lithium will not charge when cold | BMS low-temperature cutoff | Battery temperature |
FAQ
What voltage should my van battery be?
A resting 12V LiFePO4 bank reads about 13.3 V when full and 12.8 V at roughly 20% remaining. AGM and lead-acid read 12.7 V full and 12.0 V at about half. While charging, expect to see 13.6 to 14.6 V at the terminals.
How do I know if my solar panel is working?
Measure DC volts at the panel output in daylight. A 12V-nominal panel should show roughly 18 to 22 V open circuit. Near zero means a break upstream, such as a fuse, a connector or the cable entry. Correct voltage confirms the circuit is intact, but not that it is producing useful current.
Why is my battery not charging even though the panels work?
Most often the controller is not passing current: wrong chemistry setting, a failed controller-to-battery fuse, or a low-temperature cutoff on a lithium BMS. Measure at the controller's battery terminals. If that reading is not above the battery's resting voltage, no charge is flowing.
What is an acceptable voltage drop?
3% measured under load, which is about 0.36 V on a 12V system and 0.72 V at 24V. More than that points to undersized cable or a poor connection. Measure at the battery and at the appliance while the load is running, and compare.
Once you know what is undersized, size it properly with the free calculator or the wire size calculator. If nothing here explains it, our post on 7 causes of a van battery not charging covers the less common faults.